
- English
- Español
- Português
- русский
- Français
- 日本語
- Deutsch
- tiếng Việt
- Italiano
- Nederlands
- ภาษาไทย
- Polski
- 한국어
- Svenska
- magyar
- Malay
- বাংলা ভাষার
- Dansk
- Suomi
- हिन्दी
- Pilipino
- Türkçe
- Gaeilge
- العربية
- Indonesia
- Norsk
- تمل
- český
- ελληνικά
- український
- Javanese
- فارسی
- தமிழ்
- తెలుగు
- नेपाली
- Burmese
- български
- ລາວ
- Latine
- Қазақша
- Euskal
- Azərbaycan
- Slovenský jazyk
- Македонски
- Lietuvos
- Eesti Keel
- Română
- Slovenski
- मराठी
- Srpski језик

The Ultimate Guide to AR-15 Cleaning Kits: What You Need and How to Use It
Regular maintenance is non-negotiable for the reliability and longevity of any AR-15 platform rifle. Whether you are a competitive shooter, a hunter, or a home defender, a proper cleaning kit is essential. This guide breaks down the components, procedures, and best practices for keeping your rifle in top condition.
Why Cleaning Your AR-15 Is Mandatory
The AR-15's direct impingement gas system cycles carbon and unburnt powder directly back into the upper receiver and bolt carrier group. This fouling builds up quickly and, if left unchecked, can lead to malfunctions. The general rule of thumb is to clean your rifle after every 150 to 300 rounds fired, especially after tactical training or before long-term storage.
Neglecting this can cause several issues:
-
Reduced accuracy – Fouling in the barrel's rifling disrupts bullet stabilization.
-
Corrosion – Moisture from the air or rain can cause oxidation on internal metal parts.
-
Malfunctions – Heavy carbon build-up on the bolt and gas key can cause failures to feed or extract.
Key Components of an Effective AR-15 Kit
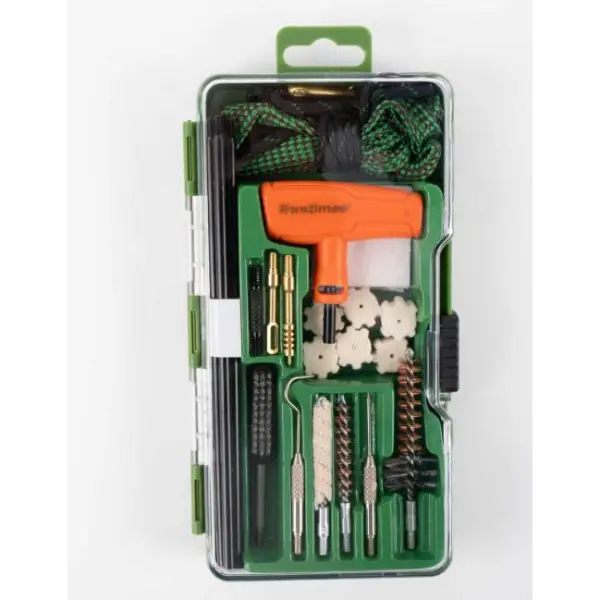
While a basic kit may contain only a rod, a brush, and a few patches, a professional-grade kit is far more comprehensive. A fully featured kit can include over 40 components to handle everything from a quick wipe-down to a full detail strip.
Here are the essential elements to look for:
Bore Brushes and Rods
The most critical component is the bore brush. For a 5.56mm AR-15, you need a .223 caliber brush. The brush diameter should be slightly smaller than the bore to avoid damaging the rifling while effectively scrubbing away carbon. Bronze brushes are preferred because they are softer than the steel barrel and will not cause scratches.
The rod is used to push the brush and patches through the barrel. Some advanced kits use a flexible cable system, which is easier to use in the field and less likely to damage the muzzle crown than a traditional steel rod.
Chamber Cleaning Tools
The chamber is where the cartridge sits, and it collects debris that can prevent proper lockup. A dedicated chamber brush is used to scrub this area. This is often paired with chamber mops, which are cotton swabs used to remove loosened debris and apply a final coat of solvent or oil.
Solvents and Lubricants
Solvents are used to dissolve carbon and copper fouling. Lubricants, often formulated as CLP, serve three purposes: clean, lubricate, and protect. Many users apply a solvent first, scrub thoroughly, and then apply a CLP for final protection against rust and wear.
Cleaning Mat
While not a tool in the traditional sense, a dedicated gun cleaning mat is essential. It protects your work surface from solvents and oil, keeps small parts from rolling away, and prevents scratches on your rifle's finish. Some high-end kits come in a rigid case that doubles as a stable workbench with fork stands to hold the rifle securely.
The Step-by-Step Cleaning Procedure
Following a specific order is crucial for effective cleaning. You should always clean from the dirtiest parts to the cleanest to avoid cross-contamination.
Step 1: Safety Check
Always ensure the rifle is unloaded. Remove the magazine and lock the bolt to the rear to verify the chamber is empty.
Step 2: Disassembly
Separate the upper and lower receivers. Remove the bolt carrier group and the charging handle.
Step 3: Clean the Barrel
Attach the correct caliber bronze brush to the rod and apply solvent to the brush. Push the brush from the breech, which is the chamber end, toward the muzzle. Repeat this process ten to fifteen times. Then remove the brush and attach a patch jag. Push a solvent-wet patch through the bore to remove the dissolved fouling, and continue running dry patches through until they come out clean.
Step 4: Clean the Chamber and Bolt Carrier Group
Use the chamber brush to scrub the chamber area. Disassemble the bolt from the carrier and clean the bolt face, extractor, and firing pin with a small brush and solvent. Wipe down the carrier body thoroughly.
Step 5: Lubrication
Apply a light coat of CLP to all moving parts. Do not over-oil; a thin, visible film is sufficient. Too much oil can attract dust and grime, which may cause additional wear over time.
Step 6: Reassembly and Final Wipe
Reassemble the rifle and wipe down the exterior with a clean cloth to remove any fingerprints.
To ensure your cleaning kit lasts, always clean the brushes after use. Solvent residue can degrade the bristles over time. Store the kit in a dry place to prevent the tools from rusting.
If you own multiple calibers, keep a universal kit with interchangeable tips, or maintain dedicated kits for each caliber. Never use a larger brush in a smaller barrel, as this can cause serious damage.